kim.zhang

风在前,无惧!


  • 首页

  • 标签42

  • 分类12

  • 归档94

  • 搜索

发表于 2021-11-21
本文字数: 15k 阅读时长 ≈ 13 分钟

1. JDBC


1.1 整合JDBC

  1. 引入依赖

这里需要注意的是mysql驱动的版本,springboot使用的mysql驱动默认版本是8,由于使用5.7版本的mysql,指定mysql驱动的版本。

druid数据库连接池不受springboot版本的管理,需要自己指定版本号。

1
2
3
4
5
6
7
8
9
10
11
12
13
14
15
16
17
<!--myql驱动-->
<dependency>
<groupId>mysql</groupId>
<artifactId>mysql-connector-java</artifactId>
<version>5.1.47</version>
</dependency>
<!--JDBC-->
<dependency>
<groupId>org.springframework.boot</groupId>
<artifactId>spring-boot-starter-jdbc</artifactId>
</dependency>
<!--连接池-->
<dependency>
<groupId>com.alibaba</groupId>
<artifactId>druid-spring-boot-starter</artifactId>
<version>1.1.16</version>
</dependency>
  1. 编写配置文件,配置datasource
1
2
3
4
5
6
7
spring:
datasource:
driver-class-name: com.mysql.jdbc.Driver
type: com.alibaba.druid.pool.DruidDataSource
url: jdbc:mysql://localhost:3306/testdb?useUnicode=true&characterEncoding=utf8&useSSL=false&serverTimezone=Asia/Shanghai
username: root
password: 123

然后直接在类中注入JdbcTemplate即可。

1
2
@Autowired
private JdbcTemplate jdbcTemplate;

1.2 JDBC多数据源

一个JdbcTemplate创建的时候需要一个datasource.

  1. 在配置文件中配置多个datasource
1
2
3
4
5
6
7
8
9
10
11
12
13
14
spring:
datasource:
one:
driver-class-name: com.mysql.jdbc.Driver
type: com.alibaba.druid.pool.DruidDataSource
url: jdbc:mysql://localhost:3306/testdb?useUnicode=true&characterEncoding=utf8&useSSL=false&serverTimezone=Asia/Shanghai
username: root
password: 123
two:
driver-class-name: com.mysql.jdbc.Driver
type: com.alibaba.druid.pool.DruidDataSource
url: jdbc:mysql://47.96.224.198:3306/seata?useUnicode=true&characterEncoding=utf8&useSSL=false&serverTimezone=Asia/Shanghai
username: root
password: 123
  1. 编写配置类配置JdbcTemplate
1
2
3
4
5
6
7
8
9
10
11
12
13
14
15
16
17
18
19
20
21
22
23
24
25
@Configuration
public class JdbcConfiguration {

@Bean(value = "datasourceOne")
@ConfigurationProperties(prefix = "spring.datasource.one")
public DruidDataSource dataSourceOne() {
return DruidDataSourceBuilder.create().build();
}

@Bean
@ConfigurationProperties(prefix = "spring.datasource.two")
public DruidDataSource dataSourceTwo() {
return DruidDataSourceBuilder.create().build();
}

@Bean
public JdbcTemplate jdbcTemplateOne() {
return new JdbcTemplate(dataSourceOne());
}

@Bean
public JdbcTemplate jdbcTemplateTwo() {
return new JdbcTemplate(dataSourceTwo());
}
}
  1. 使用的时候注意注入的方式
1
2
3
4
5
6
7
@Autowired
@Qualifier(value = "jdbcTemplateOne")
private JdbcTemplate jdbcTemplateOne;

@Autowired
@Qualifier(value = "jdbcTemplateTwo")
private JdbcTemplate jdbcTemplateTwo;

2.Mybatis


2.1 整合Mybatis

  1. 引入依赖

mybatis不是springBoot官方提供的,需要指定版本号。

1
2
3
4
5
6
7
8
9
10
11
12
13
14
15
16
17
18
<!--myql驱动-->
<dependency>
<groupId>mysql</groupId>
<artifactId>mysql-connector-java</artifactId>
<version>5.1.47</version>
</dependency>
<!--mybatis-->
<dependency>
<groupId>org.mybatis.spring.boot</groupId>
<artifactId>mybatis-spring-boot-starter</artifactId>
<version>2.22</version>
</dependency>
<!--连接池-->
<dependency>
<groupId>com.alibaba</groupId>
<artifactId>druid-spring-boot-starter</artifactId>
<version>1.1.16</version>
</dependency>
  1. 配置文件配置datasource
1
2
3
4
5
6
7
spring:
datasource:
driver-class-name: com.mysql.jdbc.Driver
type: com.alibaba.druid.pool.DruidDataSource
url: jdbc:mysql://localhost:3306/testdb?useUnicode=true&characterEncoding=utf8&useSSL=false&serverTimezone=Asia/Shanghai
username: root
password: 123
  1. 编写Mapper interface

为了让Springboot扫描到,可以在每个接口上都标记@Mapper注解,也可以在启动上标注@MapperScan扫描接口所在的包。但两种方式只能选择其中一种。

1
2
3
4
5
@Mapper
public interface StudentDao {

List<Map<String,Object>> getAllStudent();
}
1
2
3
4
5
6
7
8
9
@SpringBootApplication
@MapperScan(basePackages = "com.sise.demo.dao")
public class DemoApplication {

public static void main(String[] args) {
SpringApplication.run(DemoApplication.class, args);

}
}
  1. 编写mapper文件

mapper文件要注意的细节比较多。

mapper文件的存放位置可以在resources目录下,也可以在src目录下。

resources目录下

mapper.xml放在目录下

  • 检查xml文件所在package名称是否和Mapper interface所在的包名一一对应
  • xml文件的命名必须和Mapper interface的接口名称一一对应

mapper.xml存放位置

如果想自定义mapper.xml配置文件的名称和存放位置,可以在配置文件中指定:

1
2
mybatis:
mapper-locations: classpath:mapper/*.xml

这样mapper.xml就可以存放在resources/mapper/目录下,且xml文件的命名随意了。
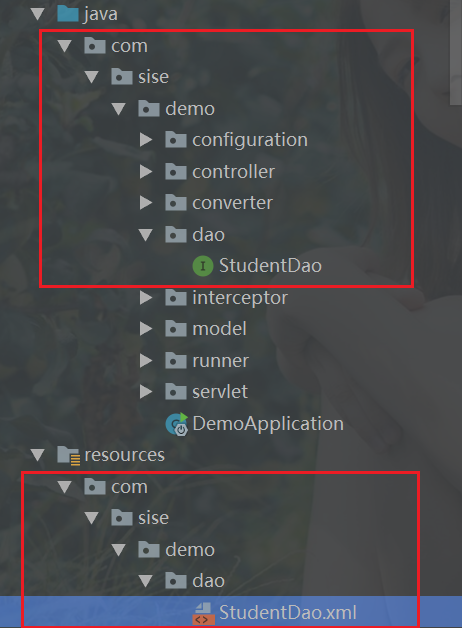
src目录下

将mapper.xml放在与StudentDao的相同目录下,报错如下:

1
Invalid bound statement (not found): com.sise.demo.dao.StudentDao.getAllStudent

这是由于maven打包的时候不会打包mapper.xml文件

mapper.xml在src目录下target目录下

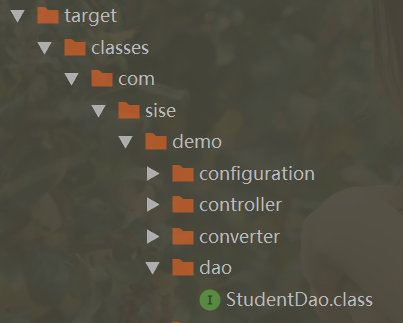
因此我们需要在pom文件中指定该目录的资源文件。

1
2
3
4
5
6
7
8
9
10
11
12
13
14
<build>
<resources>
<resource>
<directory>src/main/java</directory>
<includes>
<include>**/*.xml</include>
</includes>
</resource>
<!--为了别人导入你的jar包能正常运行,也需要指定resources目录-->
<resource>
<directory>src/main/resources</directory>
</resource>
</resources>
</build>

2.2 MyBatis多数据源

  1. 编写配置文件datasource
1
2
3
4
5
6
7
8
9
10
11
12
13
14
spring:
datasource:
one:
driver-class-name: com.mysql.jdbc.Driver
type: com.alibaba.druid.pool.DruidDataSource
url: jdbc:mysql://localhost:3306/testdb?useUnicode=true&characterEncoding=utf8&useSSL=false&serverTimezone=Asia/Shanghai
username: root
password: 123
two:
driver-class-name: com.mysql.jdbc.Driver
type: com.alibaba.druid.pool.DruidDataSource
url: jdbc:mysql://47.96.224.198:3306/seata?useUnicode=true&characterEncoding=utf8&useSSL=false&serverTimezone=Asia/Shanghai
username: root
password: 123
  1. 编写配置类

Mybatis的配置需要SqlSessionFactory、SqlSessionTemplate.

1
2
3
4
5
6
7
8
9
10
11
12
13
14
15
16
17
18
19
20
21
22
23
24
25
26
27
28
29
30
@Configuration
@MapperScan(basePackages = "com.sise.demo.dao1",
sqlSessionFactoryRef = "sqlSessionFactoryOne",
sqlSessionTemplateRef = "sqlSessionTemplateOne"
)
public class MybatisConfigurationOne {


@Bean
SqlSessionTemplate sqlSessionTemplateOne(){
return new SqlSessionTemplate(sqlSessionFactoryOne());
}

@Bean
SqlSessionFactory sqlSessionFactoryOne() {
SqlSessionFactoryBean sqlSessionFactoryBean = new SqlSessionFactoryBean();
sqlSessionFactoryBean.setDataSource(dataSourceOne());
try {
return sqlSessionFactoryBean.getObject();
} catch (Exception e) {
throw new RuntimeException(e.getMessage());
}
}

@Bean
@ConfigurationProperties(prefix = "spring.datasource.one")
DruidDataSource dataSourceOne() {
return DruidDataSourceBuilder.create().build();
}
}
1
2
3
4
5
6
7
8
9
10
11
12
13
14
15
16
17
18
19
20
21
22
23
24
25
26
27
28
29
30
@Configuration
@MapperScan(basePackages = "com.sise.demo.dao2",
sqlSessionFactoryRef = "sqlSessionFactoryTwo",
sqlSessionTemplateRef = "sqlSessionTemplateTwo"
)
public class MybatisConfigurationTwo {


@Bean
SqlSessionTemplate sqlSessionTemplateTwo(){
return new SqlSessionTemplate(sqlSessionFactoryTwo());
}

@Bean
SqlSessionFactory sqlSessionFactoryTwo() {
SqlSessionFactoryBean sqlSessionFactoryBean = new SqlSessionFactoryBean();
sqlSessionFactoryBean.setDataSource(dataSourceTwo());
try {
return sqlSessionFactoryBean.getObject();
} catch (Exception e) {
throw new RuntimeException(e.getMessage());
}
}

@Bean
@ConfigurationProperties(prefix = "spring.datasource.two")
DruidDataSource dataSourceTwo() {
return DruidDataSourceBuilder.create().build();
}
}

2.3 打印sql

1
2
3
4
5
6
7
spring:
jackson:
serialization:
indent-output: true
logging:
level:
com.ming.vhr.mapper: debug

2.4 子查询映射

继承自BaseResultMap,Collections中对column取别名就可以,别名和sql中的别名一致。

查询的结果,由于resultMap的映射后,可能会与数据库中查询的行数不同。

1
2
3
4
5
6
7
8
9
10
11
12
13
14
15
16
17
18
19
20
21
22
23
24
25
26
27
28
29
30
31
32
33
34
35
36
37
38
39
40
41
42
43
44
45
46
47
48
49
50
51
52
53
54
55
56
57
58
59
60
61
62
63
64
65
66
67
<resultMap id="BaseResultMap" type="com.ming.vhr.model.Menu" >
<id column="id" property="id" jdbcType="INTEGER" />
<result column="url" property="url" jdbcType="VARCHAR" />
<result column="path" property="path" jdbcType="VARCHAR" />
<result column="component" property="component" jdbcType="VARCHAR" />
<result column="name" property="name" jdbcType="VARCHAR" />
<result column="iconCls" property="iconCls" jdbcType="VARCHAR" />
<result column="parentId" property="parentId" jdbcType="INTEGER" />
<result column="enabled" property="enabled" jdbcType="BIT" />
<association property="meta">
<result column="keepalive" property="keepAlive" jdbcType="BIT"/>
<result column="requireauth" property="requireAuth" jdbcType="BIT"/>
</association>
</resultMap>

<resultMap id="menuTree" type="com.ming.vhr.model.Menu" extends="BaseResultMap">
<collection property="children" ofType="com.ming.vhr.model.Menu" column="parentId" autoMapping="true">
<id column="id2" property="id" jdbcType="INTEGER" />
<result column="url2" property="url" jdbcType="VARCHAR" />
<result column="path2" property="path" jdbcType="VARCHAR" />
<result column="component2" property="component" jdbcType="VARCHAR" />
<result column="name2" property="name" jdbcType="VARCHAR" />
<result column="iconCls2" property="iconCls" jdbcType="VARCHAR" />
<result column="parentId2" property="parentId" jdbcType="INTEGER" />
<result column="enabled2" property="enabled" jdbcType="BIT" />
<association property="meta">
<result column="keepalive2" property="keepAlive" jdbcType="BIT"/>
<result column="requireauth2" property="requireAuth" jdbcType="BIT"/>
</association>
</collection>
</resultMap>

<sql id="parent_menu_List" >
menu.id,
menu.url,
menu.path,
menu.component,
menu.`name`,
menu.iconCls,
menu.keepAlive,
menu.requireAuth,
menu.enabled
</sql>
<sql id="children_menu_List" >
sub_menu.id AS id2,
sub_menu.url AS url2,
sub_menu.path AS path2,
sub_menu.component AS component2,
sub_menu.`name` AS name2,
sub_menu.iconCls AS iconCls2,
sub_menu.keepAlive AS keepAlive2,
sub_menu.requireAuth AS requireAuth2,
sub_menu.parentId AS parentId2,
sub_menu.enabled AS enable2
</sql>

<select id="getMenuListByHrid" parameterType="java.lang.Integer" resultMap="menuTree">
select DISTINCT <include refid="parent_menu_List"/>,
<include refid="children_menu_List"/>
from menu
INNER JOIN menu sub_menu ON menu.id = sub_menu.parentId
INNER JOIN menu_role ON menu_role.mid = sub_menu.id
INNER JOIN hr_role ON hr_role.rid = menu_role.rid
INNER JOIN hr ON hr.id = hr_role.hrid
where hr.id = #{hrid}
and sub_menu.enabled = 1
</select>

3.JPA


3.1 整合JPA

  1. 引入依赖
1
2
3
4
5
6
7
8
9
10
11
12
13
14
15
16
17
<!--myql驱动-->
<dependency>
<groupId>mysql</groupId>
<artifactId>mysql-connector-java</artifactId>
<version>5.1.47</version>
</dependency>
<!--mybatis-->
<dependency>
<groupId>org.springframework.boot</groupId>
<artifactId>spring-boot-starter-data-jpa</artifactId>
</dependency>
<!--连接池-->
<dependency>
<groupId>com.alibaba</groupId>
<artifactId>druid-spring-boot-starter</artifactId>
<version>1.1.16</version>
</dependency>
  1. 编写配置文件
1
2
3
4
5
6
7
8
9
10
11
12
13
14
15
16
spring:
datasource:
driver-class-name: com.mysql.jdbc.Driver
type: com.alibaba.druid.pool.DruidDataSource
url: jdbc:mysql://localhost:3306/testdb?useUnicode=true&characterEncoding=utf8&useSSL=false&serverTimezone=Asia/Shanghai
username: root
password: 123
jpa:
show-sql: true
database-platform: mysql
database: mysql
hibernate:
ddl-auto: update
properties:
hibernate:
dialect: org.hibernate.dialect.MySQL57Dialect

如果不配置Dialect会出现以下错误:

1
org.springframework.beans.factory.BeanCreationException: Error creating bean with name 'entityManagerFactory' defined in class path resource [org/springframework/boot/autoconfigure/orm/jpa/HibernateJpaConfiguration.class]: Invocation of init method failed; nested exception is org.hibernate.service.spi.ServiceException: Unable to create requested service [org.hibernate.engine.jdbc.env.spi.JdbcEnvironment]
  1. 提供实体类,提供接口继承JpaRepository
1
2
3
4
5
6
7
8
9
10
11
12
13
14
15
16
17
18
19
20
@Entity
@Table(name = "login")
@Getter
@Setter
@Builder
@AllArgsConstructor
@NoArgsConstructor
@ToString
public class Student {

@Id
@GeneratedValue(strategy = GenerationType.IDENTITY)
private Integer id;

@Column(name = "loginname")
private String loninName;

@Column(name ="loginpassword")
private String password;
}

泛型的第一个参数是操作的实体类型,第二个参数是操作的实体类型的主键类型。

接口不需要加@Repository注解。

1
2
3
public interface StudentDao extends JpaRepository<Student,Integer> {

}

3.2 JPA多数据源的配置

  1. 配置文件
1
2
3
4
5
6
7
8
9
10
11
12
13
14
15
16
17
18
19
20
21
22
23
24
spring:
datasource:
one:
driver-class-name: com.mysql.jdbc.Driver
type: com.alibaba.druid.pool.DruidDataSource
url: jdbc:mysql://localhost:3306/testdb?useUnicode=true&characterEncoding=utf8&useSSL=false&serverTimezone=Asia/Shanghai
username: root
password: 123
two:
driver-class-name: com.mysql.jdbc.Driver
type: com.alibaba.druid.pool.DruidDataSource
url: jdbc:mysql://47.96.224.198:3306/bzbh?useUnicode=true&characterEncoding=utf8&useSSL=false&serverTimezone=Asia/Shanghai
username: root
password: 123

jpa:
show-sql: true
database-platform: mysql
database: mysql
hibernate:
ddl-auto: update
properties:
hibernate:
dialect: org.hibernate.dialect.MySQL57Dialect
  1. 配置类
1
2
3
4
5
6
7
8
9
10
11
12
13
14
15
16
17
18
19
20
21
22
23
24
25
26
27
28
29
30
31
32
33
@Configuration
@EnableJpaRepositories(basePackages = "com.sise.demo.dao1",
entityManagerFactoryRef = "localContainerEntityManagerFactoryBeanOne",
transactionManagerRef = "platformTransactionManagerOne")
public class JpaConfigurationOne {

@Autowired
private JpaProperties jpaProperties;

@Bean
@Primary
PlatformTransactionManager platformTransactionManagerOne(EntityManagerFactoryBuilder builder) {
return new JpaTransactionManager(localContainerEntityManagerFactoryBeanOne(builder).getObject());
}

@Bean
LocalContainerEntityManagerFactoryBean localContainerEntityManagerFactoryBeanOne(EntityManagerFactoryBuilder builder) {
return builder.dataSource(dataSourceOne())
.packages("com.sise.demo.model")
.persistenceUnit("persistenceUnit1")
.properties(jpaProperties.getProperties())
.build();
}


@Bean
@Primary
@ConfigurationProperties(prefix = "spring.datasource.one")
DruidDataSource dataSourceOne() {
return DruidDataSourceBuilder.create().build();
}
}
1
2
3
4
5
6
7
8
9
10
11
12
13
14
15
16
17
18
19
20
21
22
23
24
25
26
27
28
29
30
31
@Configuration
@EnableJpaRepositories(basePackages = "com.sise.demo.dao2",
entityManagerFactoryRef = "localContainerEntityManagerFactoryBeanTwo",
transactionManagerRef = "platformTransactionManagerTwo")
public class JpaConfigurationTwo {

@Autowired
private JpaProperties jpaProperties;

@Bean
PlatformTransactionManager platformTransactionManagerTwo(EntityManagerFactoryBuilder builder) {
return new JpaTransactionManager(localContainerEntityManagerFactoryBeanTwo(builder).getObject());
}

@Bean
LocalContainerEntityManagerFactoryBean localContainerEntityManagerFactoryBeanTwo(EntityManagerFactoryBuilder builder) {
return builder.dataSource(dataSourceTwo())
.packages("com.sise.demo.model")
.persistenceUnit("persistenceUnit2")
.properties(jpaProperties.getProperties())
.build();
}


@Bean
@ConfigurationProperties(prefix = "spring.datasource.two")
DruidDataSource dataSourceTwo() {
return DruidDataSourceBuilder.create().build();
}
}

如果出现以下错误,可能是多个数据源未加@Primary注解。

1
Parameter 0 of method localContainerEntityManagerFactoryBeanOne in com.sise.demo.configuration.JpaConfigurationOne required a bean of type 'org.springframework.boot.orm.jpa.EntityManagerFactoryBuilder' that could not be found.

4.Redis


4.1 整合Redis

一毛也是爱~
Kim.Zhang 微信支付

微信支付

  • 文章目录
  • 站点概览
Kim.Zhang

Kim.Zhang

且行且珍惜
94 日志
12 分类
42 标签
E-Mail Weibo
  1. 1. 1. JDBC
    1. 1.1. 1.1 整合JDBC
    2. 1.2. 1.2 JDBC多数据源
  2. 2. 2.Mybatis
    1. 2.1. 2.1 整合Mybatis
    2. 2.2. 2.2 MyBatis多数据源
    3. 2.3. 2.3 打印sql
    4. 2.4. 2.4 子查询映射
  3. 3. 3.JPA
    1. 3.1. 3.1 整合JPA
    2. 3.2. 3.2 JPA多数据源的配置
  4. 4. 4.Redis
    1. 4.1. 4.1 整合Redis
粵ICP备19091267号 © 2019 – 2022 Kim.Zhang | 629k | 9:32
本站总访问量 4 次 | 有 309 人看我的博客啦 |
博客全站共176.7k字
载入天数...载入时分秒...
0%